
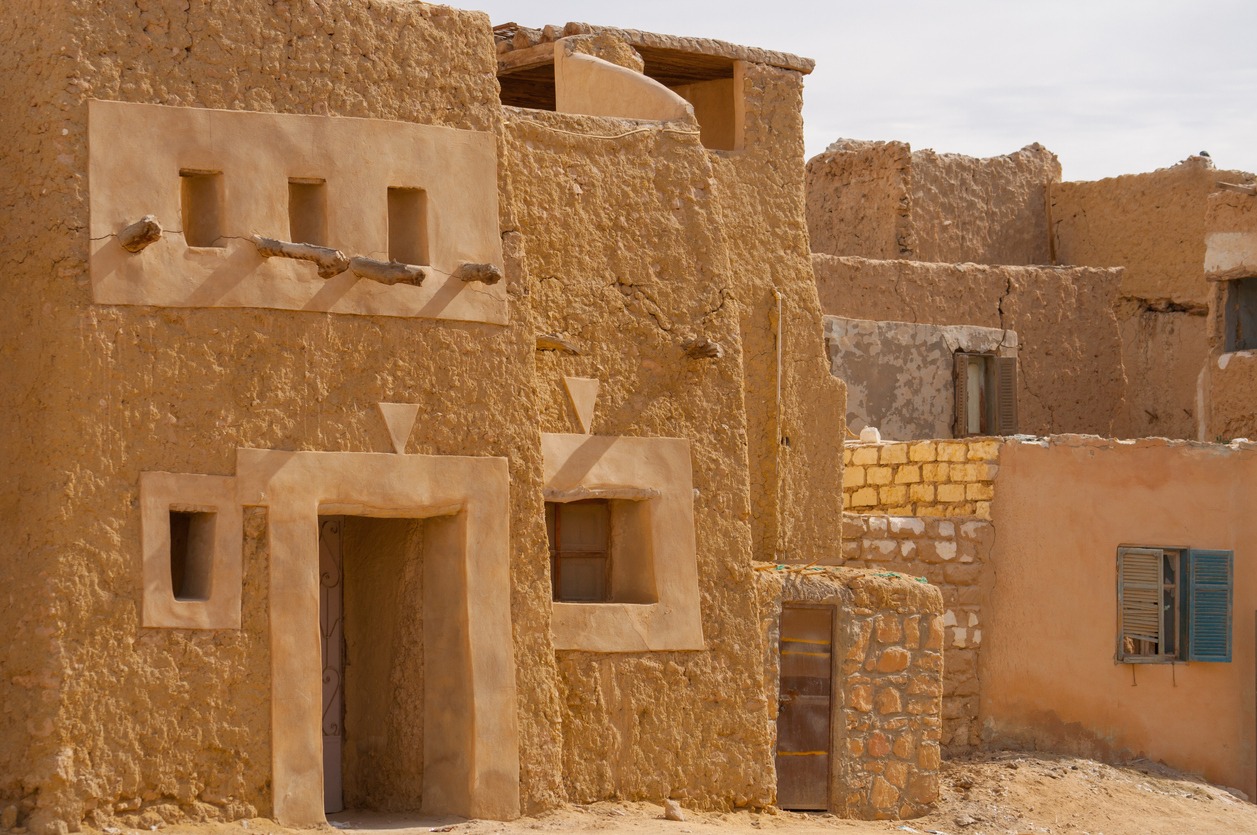
Adobe bricks are made by mixing sand, silt, and clay with water and then letting the mixture dry in the sun. If your adobe home has walls made of these bricks, covered with the same adobe plaster, it’s important to keep them in good condition, especially if they’re exposed to the elements.
The great thing is when you repair these walls, you don’t need to worry much about how they look since you can always plaster or paint over the fixed area.
However, it’s essential to keep an eye on the plaster. You’ll have to replace it if it erodes to the point where it can’t be fixed. That’s why it’s better to maintain and protect your adobe bricks rather than having to replace an entire wall.
So, let’s explore the steps in this handy guide to help you repair and safeguard the adobe brick walls in your adobe home.
Tips for Maintaining Adobe Homes

Adobe structures can last a long time if properly cared for. An excellent example is the San Miguel Mission in Santa Fe, New Mexico, built between 1610 and 1628, which is one of the oldest known structures in the U.S.
1. Perform regular inspection.
The most crucial aspect of adobe structure maintenance is continuous monitoring of potential sources of deterioration, including issues like leaky plumbing. Adobe buildings naturally deteriorate, so it’s vital to keep a close watch for subtle changes and perform regular maintenance.
The specific tasks for maintaining adobe may vary depending on factors like the building’s age, condition, location, and use. Nevertheless, it’s generally important to inspect for damage indicators like cracks, holes, stains, or mold and address them using materials and methods that are compatible with adobe.
The primary culprits of adobe wall issues include poor construction practices, excessive moisture from rainwater or ground sources, wind erosion from blowing sand, plant growth or pests within the adobe walls, and previous repairs using incompatible materials.
2. Clean the walls gently.
When cleaning the walls, opt for gentle methods like brushing, vacuuming, or low-pressure water spraying to avoid harming the surface or coating with harsh chemicals or abrasives.
3. Patch or replace damaged area.
Structural damage can occur if the adobe house needs to be built correctly. To address deterioration or damage, you can patch or replace compromised adobe with new bricks that closely match the original adobe mixture as much as possible.
4. Refresh the coating every few years.
For extra protection against the elements, a layer of mud plaster is applied to the exterior of an adobe house. This mixture typically contains clay, sand, water, and a dry material. Since unfired earthen bricks aren’t waterproof, periodic maintenance is necessary to maintain a durable adobe home.
Remember to reapply or refresh the coating every few years or when signs of wear appear. If you want to know about the origins and evolution of adobe homes, you can read the History of the Adobe House.
5. Protect the walls from the elements, erosion, and vegetation.
Additionally, safeguard the adobe walls from excessive moisture, heat, or frost by ensuring proper drainage, ventilation, shading, and insulation. Trim any trees or bushes near the adobe walls to prevent roots from destabilizing the foundation or creating moisture-related issues. If your adobe walls are susceptible to erosion, consider installing a barrier like rocks or gravel around the base of the walls to prevent soil erosion.
What Causes Deterioration of the Adobe Walls?
The durability of adobe structures depends on several factors, such as construction methods, soil selection, and local climate. Mud brick buildings often suffer from issues like cracks, erosion, spalling at the base, and a decrease in strength. These problems are mainly linked to excessive moisture.
When you own an adobe structure, it helps to know what causes the material to deteriorate. This way, you may know how to address the problem and fix it correctly.
1. Deterioration of the Base of the Wall
This happens when groundwater seeps into the wall because traditional adobe buildings typically lack waterproof foundations. It leads to deep horizontal cracks at the junction of the stone base and the adobe wall. This loss of support can make the structure unstable and cause the plaster to bulge, crack, or detach.
2. Deterioration at the Top of the Wall
When the upper part of adobe structures isn’t adequately protected, or the protective measures fail, water from overflowing gutters or a poorly maintained roof can infiltrate existing micro-cracks, causing material breakdown. Rainwater can create fissures and cracks, deteriorate surface coatings, and deform roof beams.
3. Disintegration of Adobe
Disintegration occurs when the adobe’s soil loses cohesion and the binding materials like straw or seaweed decompose. This process starts when water enters the wall’s body or runs directly on the unprotected surface of adobe masonry. Depending on temperature and humidity conditions, trapped moisture can lead to internal cracking, loss of cohesion, and detachment from the rest of the wall. Dampness can also cause timber wedges to swell, leading to the detachment of plaster and further erosion when water washes over uncoated adobe masonry.
4. Cracking
Cracking in adobe structures can result from horizontal movements within the walls, bending of the walls, or displacement of supports. These issues can be triggered by various factors such as earthquakes, ground vibrations, excessive deformations in the floor or roof structures, erosion of the wall’s base, poor drainage undermining the foundations, ground settlement, and vegetation growth. These conditions can create diagonal or vertical cracks in the wall, diagonal cracks above lintels, or detachment cracks at the wall corners. In severe cases, they may even cause the wall to collapse out of a plane or lead to the failure of wall corners, parapets, or the roof due to a loss of support.
5. Bulging or Slumping of Walls
Structural damage like bulging or slumping can occur due to poor connections between adjacent walls, irregularities during construction, or the use of materials with different mechanical properties within the adobe walls. These issues can also result from the degradation of the wall’s base. Settlement can lead to local buckling or the development of bulges, and sometimes, the growth of vegetation and tree roots can cause bulging as they penetrate the adobe walls.
How to Fix an Adobe Wall
Adobe bricks are simple constructions made from soil and water. Walls crafted from these bricks are typically joined and coated with the same adobe mixture used for the bricks. If there are minor problems, fixes are not too challenging to perform.
What You’ll Need
- Adobe plaster
- Trowel
- Adobe mortar
- Adobe bricks for larger repairs
1. Preparing the Mud
Repairing the adobe walls in your home involves several steps, such as fixing the plaster, checking the mortar, and tending to the bricks themselves. To repair the plaster on adobe homes, you’ll need to create a thick mud plaster, and you can do this by following a recipe similar to the one used for making the bricks:
- Start by combining soil, water, and sand to create a mud-like mixture.
- While stirring the mix, add straw, grass, or pine needles.
To prepare the adobe bricks, you’d typically spoon this mixture into molds and leave them in direct sunlight for 5-7 days to bake them. However, for our next step, we’ll only need the prepared adobe mud mixture without any baking involved.
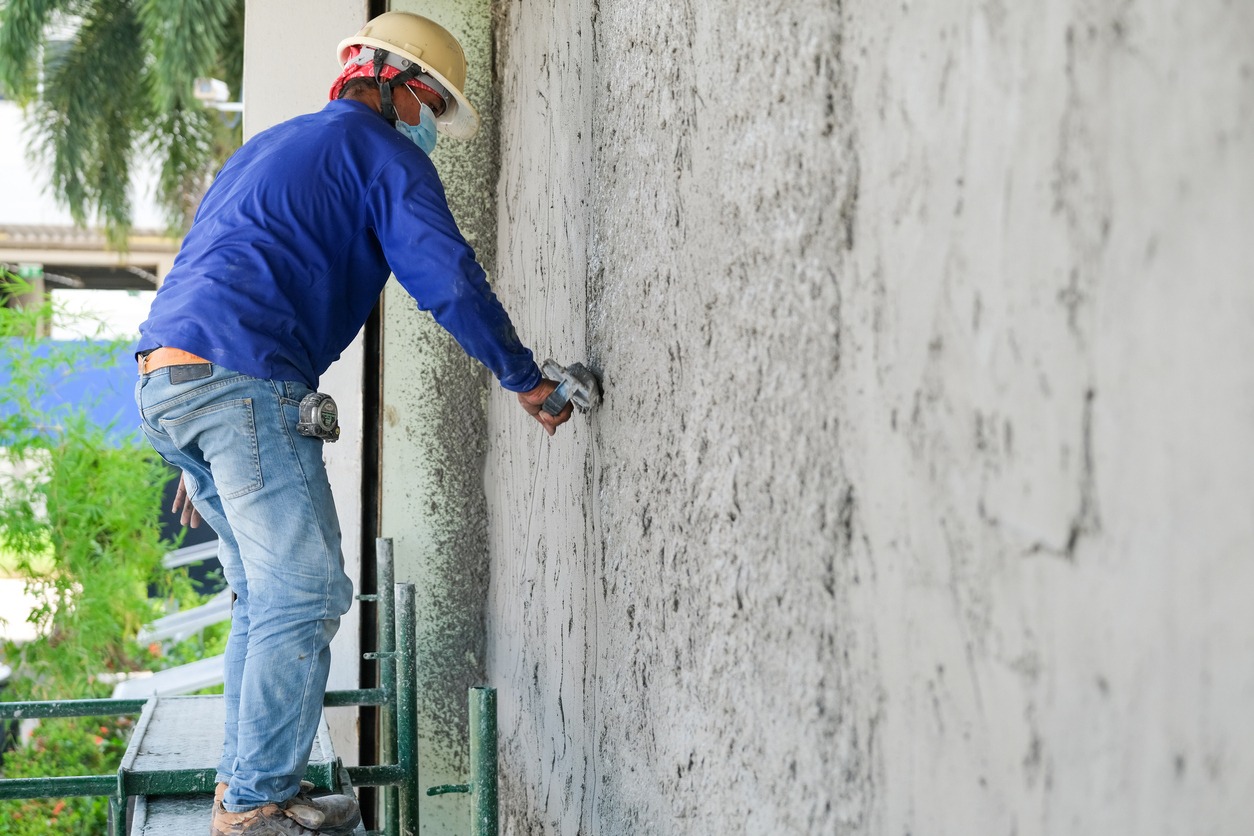
2. Repairing the Plaster
Begin by removing any cracked or deteriorated plaster from the adobe wall using a scraper. Then, spray the area you’re going to patch with water until it’s slightly damp. Follow these steps to repair the plaster:
- Scrape off any deteriorated or cracked plaster from the wall.
- Create adobe plaster using the same basic mixture as used for the bricks.
- Spray the area you’re patching with water to moisten it slightly.
- Apply the plaster to the area until you’ve filled in any depressions and matched the existing plaster’s texture.
- Allow the plaster to dry completely.
3. Repairing the Mortar
After you’ve fixed the outer plaster, it’s time to address any loose or damaged mortar in the gaps between the bricks. Here’s how to do it:
- Remove any loose or deteriorated adobe mortar from the joints between the bricks.
- Scrape out the mortar from the joints to a depth that’s two or three times the width of a typical mortar joint.
Now, let’s prepare the fresh adobe mixture, similar to what’s used for making bricks but a bit wetter than the standard recipe. You’ll also need some dry adobe plaster, so set aside a portion of the mixture without water.
- Lightly mist the area around the repair with a spray bottle filled with water until it’s damp but not soaked.
- Fill the gaps with the fresh mortar using a trowel and give it enough time to air-dry properly.
- Once it’s dried, use the prepared adobe plaster to completely cover the repaired areas. If needed, apply a bit of the dry adobe plaster mix over it to speed up the drying process.
4. Repairing the Adobe Bricks
When dealing with deteriorated adobe bricks, the extent of the damage will determine the repair approach:
For Small Areas:
- If only a small section of your brick has deteriorated, you can scrape it out and patch it with adobe mortar.
- To do this, scrape out the deteriorated brick section and apply adobe mortar to fill the gap.
- Ensure you make the area you’ll patch slightly wet; this makes it easier to work with.
- After that, insert the repaired brick into the wall and add more mortar, if necessary, to make the patch even with the surrounding bricks.
- Let the mortar dry, and then plaster over the repaired spot.
For Larger Areas:
- If a substantial area is affected, you’ll need to replace a majority of bricks or at least some of them.
- First, scrape out and remove the deteriorated parts of the bricks or the entire bricks if necessary. You may need to remove some good bricks to create a stable surface for new materials.
- Wet the area you’re going to patch.
- Apply mortar to the new bricks and insert them into the wall. Add more mortar if needed to ensure the patch is even with the rest of the wall.
- Allow the mortar to dry.
- Finally, plaster over the repaired area with adobe plaster.
5. Sealing Interior Adobe Walls
For sealing interior adobe walls, you can use a natural glue called tapioca powder mixed with water. Here’s how:
- In a bowl, combine 1.5 cups of tapioca powder with 1 cup of cold water.
- On the stove, bring 4 liters of water to a boil in a pot.
- Add the tapioca mixture to the boiling water and reduce the heat to a simmer. Stir continuously until the mixture becomes clear.
- Apply this mixture to a well-repaired adobe wall using a brush and allow it to dry overnight.
- Once the sealer sets, you can apply two coats of water-based latex or acrylic paint for interiors.
6. Sealing Exterior Adobe Brick Walls
You can use linseed oil to seal and protect exterior adobe bricks from moisture, wind, and extreme temperatures. Here’s how to prepare the sealer:
- Mix one part of boiled linseed oil with three parts paint thinner.
- Apply two coats of thinned linseed oil to the repaired exterior adobe walls using a brush and/or sprayer. Allow drying between coats.
- After the sealer has dried and set for at least 24 hours, paint your exterior adobe walls with an oil-based or acrylic paint designed for outdoor use.
- When painting exterior adobe bricks, use weatherproof paints that can withstand extreme temperatures and provide UV protection.
- Apply two or three coats of paint, allowing drying time between each coat.
7. Making Adobe Bricks Nearly Waterproof
While adobe bricks are not inherently waterproof, you can make them nearly water-resistant with these methods:
- Firing adobe bricks in a homemade kiln
- Sealing the adobe wall with paint or epoxy
- Applying 2-3 coats of Portland cement or mud to the walls
- Covering the bricks with two coats of concrete or stucco spray
By taking these steps, your adobe walls can become almost waterproof and durable. However, leaving at least one wall unfinished is advisable for a unique rustic look that also helps regulate indoor temperatures.
Tips and Important Points to Note
When it comes to working with adobe walls, there are a few key considerations:
- Never substitute adobe mortar with lime or cement mortar, and avoid using regular bricks, concrete blocks, or cinderblocks to replace adobe bricks. Mixing these materials can lead to wall cracks because they don’t expand and contract in the same way as adobe.
- Regularly maintain an adobe wall covered with natural plaster, especially if exposed to the elements. If the plaster develops cracks or erodes, it should be replaced. Remember that if you plaster over the fixed area, the bricks won’t be visible when repairing the adobe wall, so the repair doesn’t have to be exceptionally aesthetically pleasing.
- If you encounter extensive wall crumbling or major cracks that can’t be easily repaired, it’s best to leave these complex structural problems to professionals. Attempting a DIY fix may not be sufficient.
- Adobe bricks are distinct from regular bricks in that they are sun-dried, not kiln-fired. They are made from a mixture of clay, straw, and water, formed into blocks or bricks, and dried naturally in the sun. This sun-drying process reduces construction costs and allows for more customized designs.
- Adobe brick walls have a natural, earthy look that can be left unpainted if desired. However, if you ever decide to change the color, it’s possible to paint them. Here are some tips:
- Avoid applying paint directly to adobe walls, as they absorb it quickly.
- For better results when painting adobe bricks, start by applying a sealer to them.
- Use different sealers and paints for interior and exterior adobe walls to account for varying weather and temperature effects.
Techniques for Restoring Adobe Structures
Here are some methods to keep in mind when restoring adobe structures:
1. Repairing the Base of Adobe Walls
When the base of adobe walls is damaged, it’s typically fixed by replacing the deteriorated material with new adobe bricks. This replacement process is done in stages, while temporary supports are used to maintain wall stability.
If the adobe has suffered superficial damage, it’s often smoothed to create a hard surface, and a new layer of plaster is applied.
To prevent rising dampness, two main techniques are used. The first involves placing a waterproof membrane between the stone base and the adobe bricks. However, moisture can still affect the wall below the membrane. The second method aims to create an impermeable barrier within the stone base by injecting water-repellent compounds into pre-drilled holes. In practice, achieving a completely impermeable barrier is challenging, especially when the base is made of rubble masonry.
2. Restoring Deteriorated or Damaged Sections
When a part of an adobe structure has deteriorated or been damaged, it’s often locally demolished and reconstructed. In many cases, readily available fired bricks are used instead of new adobe bricks, as they are considered more durable.
A similar approach is used for repairing cracks: a small portion of the wall on both sides of the crack is removed and replaced with masonry units. In some instances, grouting injections are used to treat cracks, but this method is effective only if the crack is fully sealed. Stitching, which involves adding wooden beams and steel straps, can also be used to transfer stresses from one part of the wall to another.
3. Restoring Wall Coatings
Modern restoration of adobe structures often involves traditional techniques. These include installing wooden wedges or nails on the wall’s surface and applying gypsum plaster on the interior and lime-based plaster on the exterior. While earth rendering was once common, it’s now rarely used.
In some cases, fencing wire is attached to the wall’s surface with nails to enhance cohesion between the adobe masonry and the coating. However, this method can be inefficient because moisture can affect the nails holding the fencing wire, causing the entire coating to collapse.
Occasionally, cement-based coatings are applied to adobe structures, but this can have detrimental long-term effects. Impermeable cement-based coatings can trap moisture within the masonry, leading to material deterioration and worsening the impact of rising dampness. These coatings also produce soluble salts that can harm the adobe.
4. Strengthening Adobe Structures
Typically, the first step in strengthening adobe structures is to restore various building elements to their original size and condition. A common technique involves improving the interlocking of walls at corners, either by installing timber beams or by locally demolishing and repositioning adobe bricks for better keying.
Additionally, walls are often reinforced by adding wooden beams, poles, or a combination of timber and steel straps to enhance their connection with floors and roofs. This allows the floors and roofs to act as diaphragms, providing lateral support and resisting out-of-plane movements.
Strengthening may also involve adding wooden ring beams at the upper part of the walls. It’s worth noting that in some cases, reinforced concrete frames have been introduced in certain buildings.
However, this non-reversible and intrusive intervention alters the building’s structural system and changes the traditional character of the adobe structure.
Conclusion
Adobe homes can be cost-effective if adequately sealed and made nearly waterproof. Investing time in repairing and sealing your adobe walls before painting them is crucial. With the right preparation and adequate maintenance, your adobe walls can stand the test of time.